Sharing data
From CoGepedia
CoGe provides the capability to share genomes, experiments, and notebooks with individual users, groups of users, and the public. By default, data items are private and can only be viewed by the user who loaded the data (the "owner").
Permission Types
The term "resource" refers to a genome, experiment, or notebook. The term "modify" refers to metadata describing the resource, not the resource data (in the case of genomes and experiments source data cannot be modified). The term "delete" refers to moving the resource to "trash", data is never truly deleted and can be recovered. Resources in a notebook inherit the permissions of the notebook.
Global Permissions
- Private: by default only the "owner" (creator) of the resource can view/modify it. Other users can be given permission with various degrees of access as show below.
- Public: anyone, whether or not they are logged-in, can view the resource but cannot modify it. Registered users can be given additional permissions as shown below. This setting is intended for making resources available for publication.
User Permissions
- Reader
- Can view the resource but not modify it
- Editor
- Can view and modify the resource
- Can add and remove Reader/Editor permission for other users/groups
- Owner
- The creator of the resource. This role cannot be assigned to another user.
- Can view, modify, and delete the resource.
- Can add and remove Reader/Editor permission for other users/groups
Group Permissions
- Reader
- Can view the resource but not modify it
- Editor
- Can view and modify the resource
- Can add and remove users from the group
- Can delete the group
- Select the check-box next to data item(s) your wish to share from the list under "My Stuff"
- Click on the share button
 at the top of the list
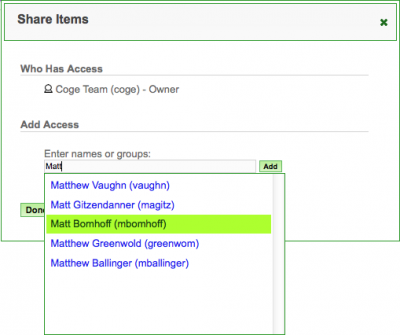
 - Search and select the person or user-group with whom you wish to share (see right).
- Click "Add" to add that person or user-group
- Click "Done" when you are finished.
- If the person you are seeking is not there, tell them to get a CoGe account
- Make sure you are logged into CoGe
- Make a notebook
- Go to your profile page: http://genomevolution.org/CoGe/User.pl
- Press the red "Create" button located on the left of the page
- This will popup a dialog box that will let you specify the info to create a notebook
- Press the red "Create Notebook" to create the notebook
- Find your notebook in your list of stuff
- You can limit your list to just notebooks by pressing "Notebook" under the "My Stuff" list in the menu on the left
- You can search for your notebook by name using the search box located to the top-right of the list
- Click on your notebook in the list which will take you to NotebookView
- Add your genome to the notebook by pressing "+Add Item" under "Contents"
- You can also add other data here including public genome, experiments, etc.
- You can share your notebook with other CoGe users by
- Going to your profile page: http://genomevolution.org/CoGe/User.pl
- Finding your notebook and selecting it with the checkbox besides its name
- Pressing the user icon (Little person picture above your list)
- This will popup a dialog box called "Share Items"
- Searching for a user or group by name in the search box
- Pressing "Add" to add them
- Create user group:
- Go to your profile page: http://genomevolution.org/CoGe/User.pl
- Press the green "Create" button
- Select "New Group"
- This will popup a dialog box called "Create New Group"
- Fill out the name and description of the group
- Select the role of the group
- Reader can view data, but not modify the members of or information about the group
- Editor can modify the members of and information about the group
- To add users to the group
- Find the group in your list of stuff by typing in the group name in the search box located top-right of the list
- You can limit your list of stuff to just groups by pressing "Groups" in the menu to the left
- You can search for the group
- Select the group by pressing the checkbox next to the group
- Press the "gear" icon at the top of the list to configure the group
- Add users to the group by pressing the "modify users" button
- This will popup a dialog box called "Edit Group"
- Search for users by name in the search box and press "add" to add them to the group
- Once the group is created, a genome (or other item such as a notebook or an experiment) can be shared with it by following the directions above
